Thursday, 28 November 2013

∞Light Up Your Out Door Life∞

We have all seen them, we know they are out there but who had taken the time to seriously consider the benefits of a solar light. These eco-friendly options are often give a bad wrap for being ineffective and cheap. Time to see the light folks, these small lights can pack a big punch for you yards and leave your wallet well enough alone.

LED solar lights are sold at most hardware store and garden centers and come in variety of shapes sizes and colors. These simple little lights can bring out the best in your landscape with a range of inexpensive little pathway lights, up to the higher end options that can light up your trees or social area. What ever you need there is often a solar light for you.

Using solar energy is already a growing craze, but for those a bit unfamiliar with the benefits here is a small break down. Solar lights will greatly reduce any back yard electricity bill, they are self activating preventing the need for unsightly control boxes. The wireless lights keep play area's safe for children, pets, or even those animals the you love to see visit your landscape. LED lighting does not heat up and in the warmer stages of summer there is no risk for fire or once again an unwanted burn to people or pets. Even in the event of a power outage, you will be able to find your way around your yard and for an outdoor fuse box this could be a life saver. The list goes on, and for more benefits visit your local google search or check out the this link! --->  http://www.thenewecologist.com/2010/05/top-8-benefits-of-using-solar-outdoor-lights/

Now to take a look at your options! Uses are complimented by a variety of styles and colors to suit your your yard and personal style to a tee. From highlights to path lights solar power is there for you. Check it out:

Highlight your plants of favorite features. 

See your way down any path:

Bring out the rippling beauty of your ponds and pools:

Now I know there are some of you that feel you cannot afford the fancy ones that would best suit your space, but don't worry not all hope is lost. If you can afford some outdoor paint and own painters tape or lint rollers have no fear. With the light and solar pad protected its simple enough to take apart the inexpensive spike lights and paint them up as you see fit. Check out the video below for a basic overview on how to do this. Keep in mind to be safe when using sharp object and if need be use a mask when spraying. Do not spray over your lawn or any item that you don't want to see colored and wear gloves and cloths that your not to fond of. The sky is the limits with hand painted lights!

Tuesday, 19 November 2013

∞Make Your Paths Permeable∞

Our soils clean water as it peculates back into the water table, cleansing most of the filth before it reaches our rivers and other water bodies. Unfortunately the majority of our urban landscapes are concrete and stone which is designed to run the water down into the streets and through the drains straight to the our rivers, lakes, and oceans. Without allowing the soil and roots of the landscape remove harmful toxins, we are further poisoning our natural water sources. Up till now we had few options on how to better our ways, and maintain harscape surfaces while considering where water would run.

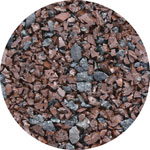
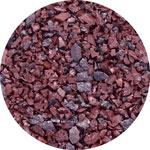
Today, there is a glimmer of hope to that bleak future, and its not just permeable but also recycled. Using up the very tires that often require these surfaces, 'PorusPave' has formulated a solution. Durable, flexible, and permeable, this company has the answer for hard concrete surfaces, and water shedding brick pavers. Strong but light weight the rubber chips make for a flexible and frost crack resistant surface. This product can be mixed up on sight, and used on new or existing landscape. 'PorusPave' is 55% lighter then competing bricks and concrete, and uses a staggering 300 scrap tires to make 1,000 square foot area at 2 inches deep. 2 inches being plenty for light vehicular traffic such as a driveway or homestead lane way.

Check out the video's below to see for yourself just how easy to use, and beneficial this material really is. But first, take a look at some of these neat ways to integrate this recycled tire, water saving product into your yard.

 
If your not one who can believe things without seeing it fist hand, why not try some of the following videos. A picture speaks a thousand words, but a video is a thousand pictures.


Tips and tricks on the install, look no further. Here is a simple video giving the basics on how easy it can be to install this concret/brick alternative. Check out the link to this installation video:

Also why not check out that variety of colors offered by 'PorusPave' and find your style while allowing water to drain freely.

Black
Brown


Natural


Redwood
Tan


Earthy


Green

Blue


Fancy


For more information on the overall product please check out http://www.porouspaveinc.com/ and inquire about the various applications, the environmental benefits, or more on how to install. 

Wednesday, 13 November 2013

∞Pot me now∞

We all love our little herb gardens, but sometimes it just needs that extra spark to really bring the functionality and style full circle. Today we will tour the many themes and styles you can experiment with for your indoor or outdoor herb gardens.

Lets start with why herb gardens are so loved. Who does not like that fresh flavor of herbs you poured your time and love into all year long, its unmatched by any store bought products and can be simple and cost effective for any home owner. Second, this method of plant care is both an indoor or outdoor activity. If you live in a flat, condo, apartment, suburban home, or acreage so long as you have light and water these plants can be your garden.

Herb garden project do not just provide us with a greener life style, but they also provide a way to recycle our own tins and container. Herb garden projects can be fun your you, your family, or even used as small projects for school kids or hospital patients. Herb can planting is a relaxing low cost project that provides a long lasting result (if adequately watered and given solar exposure). These are great ways to teach responsibility as well as how good habits can be rewarding.

Now to the fun part, what sorts of projects are out there for us to build on or gain our own inspirations!

To keep things simple, here is the basic can and herb idea. There is lots of room to expand on design, or you can even leave the tin in their original and beautiful silver shin. Follow the simple steps found through the link below, and feel free to comment with your creative designs.


Maybe you want to step things up a bit, and have other old tins laying around. Well if you like the vintage look, or opt to paint over these as well, here are some other ideas for your herbs including my personal favorite the tea can herb planter.


Want to get a bit crazy and creative, well for those advanced gardeners out there we have something for you as well. Do you like the idea of conserving your space but still need your plants to get light. How about hanging them above the sink or any other windows around the home? Check out this site and see for yourself how you too can enjoy the sweet scent of herbs and an easy accessibility while slaving over the sink or stove.

To check out the how to:


Now its down to the meat of the projects, what herbs to use. Some of my personal recommendations for starters would be as follows, but remember there are lots of herbs to try so talk to your local garden centers and growers to find new options or starter plants and seeds.


Oregano - Oregano is a staple in most Italian cooking and is easy to grow. The leaves can be dried or they can be used fresh in any tomato dish. It is one of the easiest herbs to grow and can be grown in just about any area inside or outside. It should have soil that is well drained and also likes full sun, but it will even grow in soil that is rocky and poor.


Thyme - This is an herb that is perennial and easy to care for. It is very hardy and grows into a plant that is much like a shrub. It prefers a lot of sun and a warm climate to grow well, along with well drained but moist soil. If you are growing thyme in the house, you should make sure that you put the plant near the window so it gets the most sunlight.

Basil - Basil is another annual herb that does well in warm weather. It grows well in many places, but for the best flavor, it needs to have conditions that are hot and dry. The soil should be very rich and a bit moist and it should be kept in full sun. It's important that you make sure that basil gets plenty of heat and light and between watering it the basil should have time to dry out.


All the information above is cited from, so for some more options feel free to click here ---> http://www.streetdirectory.com/food_editorials/cooking/herbs_and_spices/easy_herbs_for_a_starter_herb_garden.html

Feel free to share your ideas or link to neat ideas in the comments and let us know what your doing with your recycled tins and herb gardens!


Wednesday, 6 November 2013

∞Add Life To Your Yard With Dead Wood∞

Most of us see the eco friendly way is to compost yard trimmings, twigs, and other assorted greenery. When it comes to the larger branches and trunks, some can be left feeling 'stumped'.

Weathers its a freak storm, damaging winds, or space, we sadly have to take down trees every so often. Don't let the majesty of a well grown tree, die at the end of a chain saw and fire. There are plenty of ways to utilize the branches and trunks of our fallen friends, to keep that natural feel to our yards in a functional and fun way.

Before we get into the fun things, a reminder to all those looking to use up the stumps and trunks of removed trees. Always remove the stump! You may not see it at first, but leaving stumps in the ground can cause rot to develop in the roots. This fungal infection can potentially spread to touching root systems of the same species and damage those trees in your yard that you would like to keep. If you want to preserve that in ground look, cut off the trunk near to the base and when placing your creation, lightly bury the end to give the illusion that it is still in tact. But I repeat, please do not risk injuring your living trees, and grind out your stumps.

Now onto the exciting examples of ways to enjoy your woody plants long after they bite the dust.

When storms blow in its common to loose branches, some lager then we would like to see fallen into our
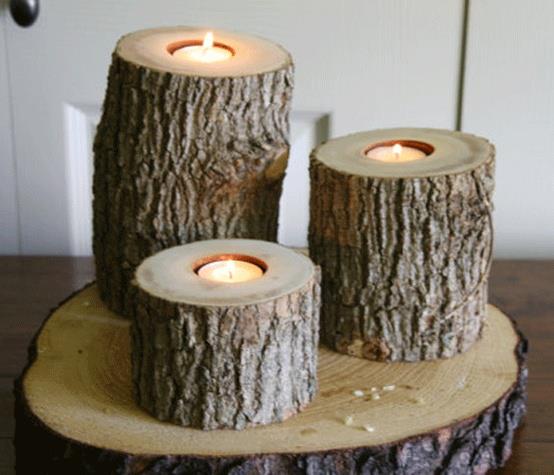
yards. With the right tools and a bit of time, these branches can be the foundation for a lot of garden accessories. One I would like to highlight being candle holders. While most enjoy the evening ambiance, we can see more practical applications by using the ever popular mosquito candles. Believe in them or not, its a great way to make your insect controls look like they belong with a nice bark exterior.

Check out this quick how to with Martha Stewart --> http://www.marthastewart.com/920872/how-make-natural-wood-candle-holders

If, sadly, the whole thing has to go there are ways to use that broader wood to your homes advantage. Want a bench, but are tired of the high prices on those treated teak ones at your local garden center. Use the opportunity presented to make your own tables, benches or even stools. If you have your yard furniture already, then maybe consider a stand for your bird houses, or bird baths. With little skill required, its simple to  use your remaining trunk to offer stability for a multitude of projects. Take a look at these examples, and find your stump style.

Follow this easy how to guide for a simple stump bench. --> http://www.ehow.com/how_12152135_make-simple-treestump-bench.html

The Simple Trunk Bench

A Woodland Stand for your Bird Bath

An at Home Feel for Your Local Birds


Remember! Always use power tools, chainsaws, and stump grinders safely. Wear appropriate personal protective equipment like gloves, protective eye wear, and steel toed boots. If your unsure how to operate the tools required, find or hire a helping hand. Watch out for power lines and call before you dig. A back yard project is not worth life or limb.


Wednesday, 30 October 2013

∞Green Roofs Are Going To The Dogs∞

No its not figurative, we literally mean they are going to the dogs. Dog houses that is!

Green Roofs have been spreading world wide as a great way insulate homes, improve water retention, and keep that retained water cleaner. Unfortunately for most of us it means a big investment, and some serious load bearing adjustments. On the smaller scale though, it is easy enough to get the beautiful garden space at far more manageable height and cost. Find a friend or gather the family and make a weekend out of renovating your dogs home into an insulated, eye catching, dream house.


On top of being good for you dog in the hot days of summer, or the child night of fall, a green roof dog house can even provide drinking water that is cleaner then any man made filtering system can provide. Set up your green roof drainage over a bowl or bucket and you've got that chore covered.


Don't have a dog or spouse that would use such an out door retreat, but still want to try your hand at Green Roofing? Try a bird house. Its the same concept, but provides a new look to an old idea. Invite beautiful birds to live near you home, and provide them with a cool and comfortable living space. These bird houses are a great way to get children involved in the green movement, and educate them on gardening, while at the same time having some fun. Take a look here for a quick way to modify your current bird house, or to get some ideas for building your own.


Most commonly in Green Roofs you will see Sedum(Stonecrop). These plants tend to do very well in the small, low moisture space.  However some cascading plants, grasses and annuals will also do well in the green roof setting, depending on the exposure, space, and soil depth. Find what words best for you, the opportunities are endless. Check out your local nurseries and explain the application, most often they will be able to point you in the right direction.

If your not sure were to start though, here are some neat looking sedum to try. (Plants referenced from Eagle Lake Nurseries http://www.eaglelakenurseries.com/index.php)


Tricolor Stone Crop
Sedum spurium "Tricolor"

Perennial - Partial Shade to Full Sun
Zone: 3a
Height: 6"
Spread: 18"


Frosty Morn Stonecrop
Sedum "Frosty Morn"

Perennial - Partial Shade to Full Sun
Zone: 3a
Height: 27"
Spread: 23"


Angelina Stonecrop
Sedum rupestre "Angelina"

Perennial - Partial Shade to Full Sun
Zone: 3a
Height: 6"
Spread: 15"

Wednesday, 23 October 2013

∞Retaining Your Rain With Style∞

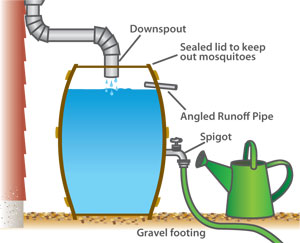
http://dublinohiousa.gov/dev/dev/wp-content/uploads/2013/04/rain-barrel-diagram.jpgRain barrels, a simple but fantastic way to reduce your
garden water bill. The concept is easy, water runs from your roof down the spout. Each drop, instead of running down your driveway or in a concentrated sink hole in your lawn, it gathers in a barrel. A wooden lid prevents debris and water breeding bugs from contaminating the water and reduces evaporation. A spigot hear the bottom releases the water into your desired distribution system and voila, you have yourself sustainable and cost reducing water supply.

On the market today however, consumers often face a dilemma when it comes to this simplistic water conservation option. Large, chunky, plastic green bins are most often the first option presented to home owners. Some can see past the un-savory outsides of everyday plastic barrels, but in the evolution from back yard to personal paradise, people won't risk the eye sore even for its eco friendly value. Fear not home owners, there are plenty of alternative and functional Rain barrels to suit any yard, front or back.  Take a look at some of these examples and start the search for your perfect style.


Looking for that rustic old school barrel, and still wanting to go green? Try this true to name barrel version of the water retention system. Keep the beauty, and get that classic wooden beauty.


Enjoy planters and don't want your Rain Barrel to take up any more space then it needs. Try a combination effect. Stylish, modern, and functional, this barrel wont take away from your garden space and can bring color and water to your home.


Ever wanted a waterfall but never cared for the electrical bill or annoying pump sounds. Try this cold stone look for your Rain water collection system. Overflow will trickle down and giving you that picturesk trickle, and offer you flowing water for days to come.


Now that you have selected the perfect Rain Barrel, its time to install it. Don't worry, it can be as easy as it is beautiful and funcitonal. Follow along with the steps in this video, and you will be collecting water before you know it.
Click Here ---> http://youtu.be/OGwp5s0CH8k

Also if you need a bit more information before making your choice, check out this site by healthy landscapces and the University of Rhode Island.
Click Here ---> http://www.uri.edu/ce/healthylandscapes/rainbsources.html

Not sure how to maintain your current barrels, or still need some tips on set up check out EPCOR.
Click Here ---> http://www.epcor.com/efficiency-conservation/outside-your-home/Pages/rain-barrels.aspx